
Mi Primer Módulo Magento 2 – CustomAttribute

Vamos a crear tu primer módulo Magento 2, para ir aprendiendo la estructura y funcionamiento de Magento 2.
El módulo se encargará de agregar un custom attribute a la dirección de cliente:
Paso 1
Creamos un directorio para el módulo:
app/code/Magentochile/CustomAttribute
Paso 2
Declarar el módulo para que comience a existir con module.xml en:
app/code/Magentochile/CustomAttribute/etc/module.xml
<?xml version="1.0"?>
Notarás que hemos agregado sequence Magento_Customer para el módulo, que más adelante en el desarrollo del módulo entenderás.
Paso 3
Necesitamos registrar el módulo en Magento 2, y para ello, se debe crear un archivo llamado registration.php:
app/code/Magentochile/CustomAttribute/registration.php
<?php
\Magento\Framework\Component\ComponentRegistrar::register(
    \Magento\Framework\Component\ComponentRegistrar::MODULE,
    'Magentochile_CustomAttribute',
    __DIR__
);
Paso 4:
Creamos un archivo composer.json en:
app/code/Magentochile/CustomAttribute/composer.json
{
  "name": "magentochile/magento-2-customattribute",
  "description": "Mi Primer Módulo Magento 2 - CustomAttribute",
  "type": "magento2-module",
  "version": "1.0.0",
  "require": {
    "php": ">=5.5.22|~5.6.0|7.0.2|7.0.4|~7.0.6",
    "magento/framework": "100.0.*|100.1.*"
  },
  "repositories": {
    "type": "composer",
    "url": "https://repo.magento.com/"
  },
  "minimum-stability": "stable",
  "autoload": {
    "files": [
      "registration.php"
    ],
    "psr-4": {
      "Magentochile\\CustomAttribute\\": ""
    }
  }
}
Paso 5
Para este módulo, vamos a agregar un archivo Setup/InstallData.php el cual grabará la base de datos, con nuestro “Custom” Attribute para dirección del cliente:
app/code/Magentochile/CustomAttribute/Setup/InstallData.php
<?php

namespace Magentochile\CustomAttribute\Setup;

use Magento\Customer\Api\AddressMetadataInterface;
use Magento\Eav\Setup\EavSetup;
use Magento\Framework\Setup\InstallDataInterface;
use Magento\Framework\Setup\ModuleContextInterface;
use Magento\Framework\Setup\ModuleDataSetupInterface;
use Magento\Eav\Model\Config;

/**
 * Class InstallData
 * @package     Magentochile\CustomAttribute\Setup
 */
class InstallData implements InstallDataInterface
{
    /**
     * Attribute Code of the Custom Attribute
     */
    const CUSTOM_ATTRIBUTE_CODE = 'custom';

    /**
     * @var EavSetup
     */
    private $eavSetup;

    /**
     * @var Config
     */
    private $eavConfig;

    /**
     * InstallData constructor.
     * @param EavSetup $eavSetup
     * @param Config $config
     */
    public function __construct(
        EavSetup $eavSetup,
        Config $config
    ) {
        $this->eavSetup = $eavSetup;
        $this->eavConfig = $config;
    }

    public function install(ModuleDataSetupInterface $setup, ModuleContextInterface $context)
    {
        $setup->startSetup();

        $this->eavSetup->addAttribute( // set 'custom' attribute in table `eav_attribute` attribute_Id 135 Magento 2.2.0 clean
           AddressMetadataInterface::ENTITY_TYPE_ADDRESS,
            self::CUSTOM_ATTRIBUTE_CODE,
            [
                'label' => 'Custom',
                'input' => 'text',
                'visible' => true,
                'required' => false,
                'position' => 150,
                'sort_order' => 150,
                'system' => false
            ]
        );

        $customAttribute = $this->eavConfig->getAttribute(
            AddressMetadataInterface::ENTITY_TYPE_ADDRESS,
            self::CUSTOM_ATTRIBUTE_CODE
        );

		// set in table `customer_form_attribute` -  attribute_id 135 Magento 2.2.0 clean
		// used_in_forms (usados en forms): 'adminhtml_customer_address', 'customer_address_edit', 'customer_register_address'
        $customAttribute->setData(
            'used_in_forms',
            ['adminhtml_customer_address', 'customer_address_edit', 'customer_register_address']
        );

        $customAttribute->save();

        $setup->endSetup();
    }
}
Este archivo grabará la tabla `eav_attribute` el attribute ‘custom’ en la base de datos. Su attribute_id es 135 en versión Magento 2.2.0. El cual, le da la indicación que debe ser usado en los forms (used_in_forms) en:
['adminhtml_customer_address', 'customer_address_edit', 'customer_register_address']
Relacionado con la tabla `customer_form_attribute`.
Paso 6.
Creamos un archivo extension_attributes.xml en:
app/code/Magentochile/CustomAttribute/etc/extension_attributes.xml
<?xml version="1.0"?>
Paso 7
Los 3 primeros pasos de este tutorial, son los necesarios para que el módulo exista. Los pasos 4, 5 y 6 son para crear nuestro attributo.
Ahora lo activaremos:
php bin/magento module:enable Magentochile_CustomAttribute
Y la consola ssh, debería entregarte una respuesta como esta:
The following modules have been enabled:
- Magentochile_CustomAttribute

To make sure that the enabled modules are properly registered, run 'setup:upgrade'.
Cache cleared successfully.
Generated classes cleared successfully. Please run the 'setup:di:compile' command to generate classes.
Info: Some modules might require static view files to be cleared. To do this, run 'module:enable' with the --clear-static-content option to clear them.
Como verás, la consola te indica que debes ejecutar setup:upgrade y cache cleared para el correcto funcionamiento del módulo. Entonces aplicamos los dos siguientes comandos:
php bin/magento setup:upgrade
php bin/magento cache:clean
Para ver el status de tu nuevo módulo, aplica el siguiente comando:
php bin/magento module:status
Y el resultado debería ser algo parecido a esto:
...
Magento_Weee
Magento_CatalogWidget
Magento_Wishlist
Magentochile_CustomAttribute

List of disabled modules:
None
Paso 8
Revisar por phpMyadmin que tu nuevo attribute ‘custom’ ha sido ingresado correctamente a la tabla `eav_attribute`. Ver imagen a continuación:

Paso 9
Vamos a referirnos al estimado señor Max Pronko, a su canal youtube Max Pronko. Canal del cual sacamos, escribimos y adaptamos línea por línea, las siguientes partes del módulo:
Parte A:
Creamos a Model/Customer/AddressEditPlugin.php en:
app/code/Magentochile/CustomAttribute/Model/Customer/AddressEditPlugin.php
<?php
namespace Magentochile\CustomAttribute\Model\Customer;

use Magento\Framework\View\LayoutInterface;

class AddressEditPlugin
{

	/**
	* @var layoutInterface
	*/
	private $layout;

	// inyect

	/**
	* AddressEditPlugin constructor
	* @params LayoutInterface $layout
	*/
	public function __construct(
		LayoutInterface $layout
	)
	{
		$this->layout = $layout;
	}


	/*
	* @param \Magento\Customer\Block\Edit $edit
	* @param string $result
	* @param string
	*/
	public function afterGetNameBlockHtml(
	\Magento\Customer\Block\Address\Edit $edit,
	$result
	) {

	$customBlock = $this->layout->createBlock(
		'Magentochile\CustomAttribute\Block\Customer\Address\Form\Edit\Custom',
		'magentochile_custom_attribute'
		);
	return $result . $customBlock->toHtml();
	}

} // end class
Parte B:
Declaramos el Model ingresado, agregando el directorio etc/frontend y el archivo di.xml:
app/code/Magentochile/CustomAttribute/etc/frontend/di.xml
<?xml version="1.0"?>
Parte C:
Creamos el directorio Block, para luego agregar los siguientes subdirectorios y 2 archivos:
archivo 1:
app/code/Magentochile/CustomAttribute/Block/Customer/Address/Form/Edit/Custom.php
<?php

namespace Magentochile\CustomAttribute\Block\Customer\Address\Form\Edit;

use Magento\Customer\Api\AddressRepositoryInterface;
use Magento\Customer\Api\Data\AddressInterface;
use Magento\Framework\Exception\NoSuchEntityException;
use Magento\Framework\View\Element\Template;

use Magento\Customer\Api\Data\AddressInterfaceFactory; // to private $addressFactory;
use Magento\Customer\Model\Session; // to customer session

class Custom extends Template
{

	/**
	* @var AddressInterface
	*/
	private $address;

	/**
	* @var AddressRepositoryInterface
	*/
	private $addressRepository;

	/**
	* @var AddressInterfaceFactory
	*/
	private $addressFactory;

	/**
	* @var Session
	*/
	private $customerSession;

	public function __construct(
		Template\Context $context,
		AddressRepositoryInterface $addressRepository,
		AddressInterfaceFactory $addressFactory,
		Session $session,
		array $data = []
	) {
		parent::__construct($context, $data);
		$this->addressRepository = $addressRepository;
		$this->addressFactory = $addressFactory;
		$this->customerSession = $session;
	}

	protected function _prepareLayout()
	{

	$addressId = $this->getRequest()->getParam('id');

	if ($addressId) {
		try {
		$this->address = $this->addressRepository->getById($addressId);
		if ($this->address->getCustomerId() != $this->customerSession->getCustomerId()) {
			$this->address = null;
		}

		} catch (NoSuchEntityException $exception) {
			$this->address = null;
		}
	}

	if (null === $this->address) {
		$this->address = $this->addressFactory->create();
	}

	return parent::_prepareLayout();
	}

	protected function _toHtml()
	{
		$customWidgetBlock = $this->getLayout()->createBlock(
			'Magentochile\CustomAttribute\Block\Customer\Widget\Custom'
		);

		$customWidgetBlock->setAddress($this->address);
		return $customWidgetBlock->toHtml();
	}

} // end class
archivo 2:
app/code/Magentochile/CustomAttribute/Block/Customer/Widget/Custom.php
<?php

namespace Magentochile\CustomAttribute\Block\Customer\Widget;

use Magento\Framework\Exception\NoSuchEntityException;
use Magento\Customer\Api\AddressMetadataInterface;
use Magento\Customer\Api\Data\AddressInterface;
use Magento\Framework\View\Element\Template;

class Custom extends Template
{

	/**
	* @var AddressMetadataInterface
	*/
	private $addressMetadata;

	public function __construct(
		Template\Context $context,
		AddressMetadataInterface $addressMetadata,
		array $data = []
	) {
		parent::__construct($context, $data);
		$this->addressMetadata = $addressMetadata;

	}


	protected function _construct()
	{
		parent::_construct();
		$this->setTemplate('widget/custom.phtml');

	}

	/**
	* @return bool
	*/
	public function isRequired()
	{
		return $this->getAttribute()
		?	$this->getAttribute()->isRequired()
		: false;
	}


	/**
	* @return string
	*/
	public function getFieldId()
	{
		return 'custom';
	}

	/**
	* @return \Magento\Framework\Phrase\String
	*/
	public function getFieldLabel()
	{
		return $this->getAttribute()
		?	$this->getAttribute()->getFrontendLabel()
		: __('Custom'); // to translate
	}

	/**
	* @return string
	*/
	public function getFieldName()
	{
		return 'custom';
	}

	/**
	* @return string|null
	*/
	public function getValue()
	{
		/** @var AddressInterface $address */
		$address = $this->getAddress();
		if ($address instanceof AddressInterface) {
			return $address->getCustomAttribute('custom')
			? $address->getCustomAttribute('custom')->getValue()
			: null;
		}
		return null;
	}

	// public function getAttribute() { wrong public must private
	private function getAttribute()
	{
		try {
		$attribute = $this->addressMetadata->getAttributeMetadata('custom');
		} catch (NoSuchEntityException $exception) {
			return null;
		}
		// return $attribute[0]; // to fix by Max Pronko but error blank page if client login with empty custom
		// return $attribute; // Max Pronko but error

		// to fix by Magento Chile, customer with or not custom attribute
		if (!$attribute) {
		return $attribute[0];
		}
		else {
		// var_dump($attribute);
		return $attribute;
		}
		// end to fix by Magento Chile, customer with or not custom attribute
	}

} // end class
Parte D:
Creamos un directorio view/frontend/templates/widget/ con el archivo custom.phtml:
app/code/Magentochile/CustomAttribute/view/frontend/templates/widget/custom.phtml
<?php /** @var \Magentochile\CustomAttribute\Block\Customer\Widget\Custom $block */ ?>
Paso 10:
Realizamos un upgrade y clear caché:
php bin/magento setup:upgrade
php bin/magento cache:clean
Paso 11:
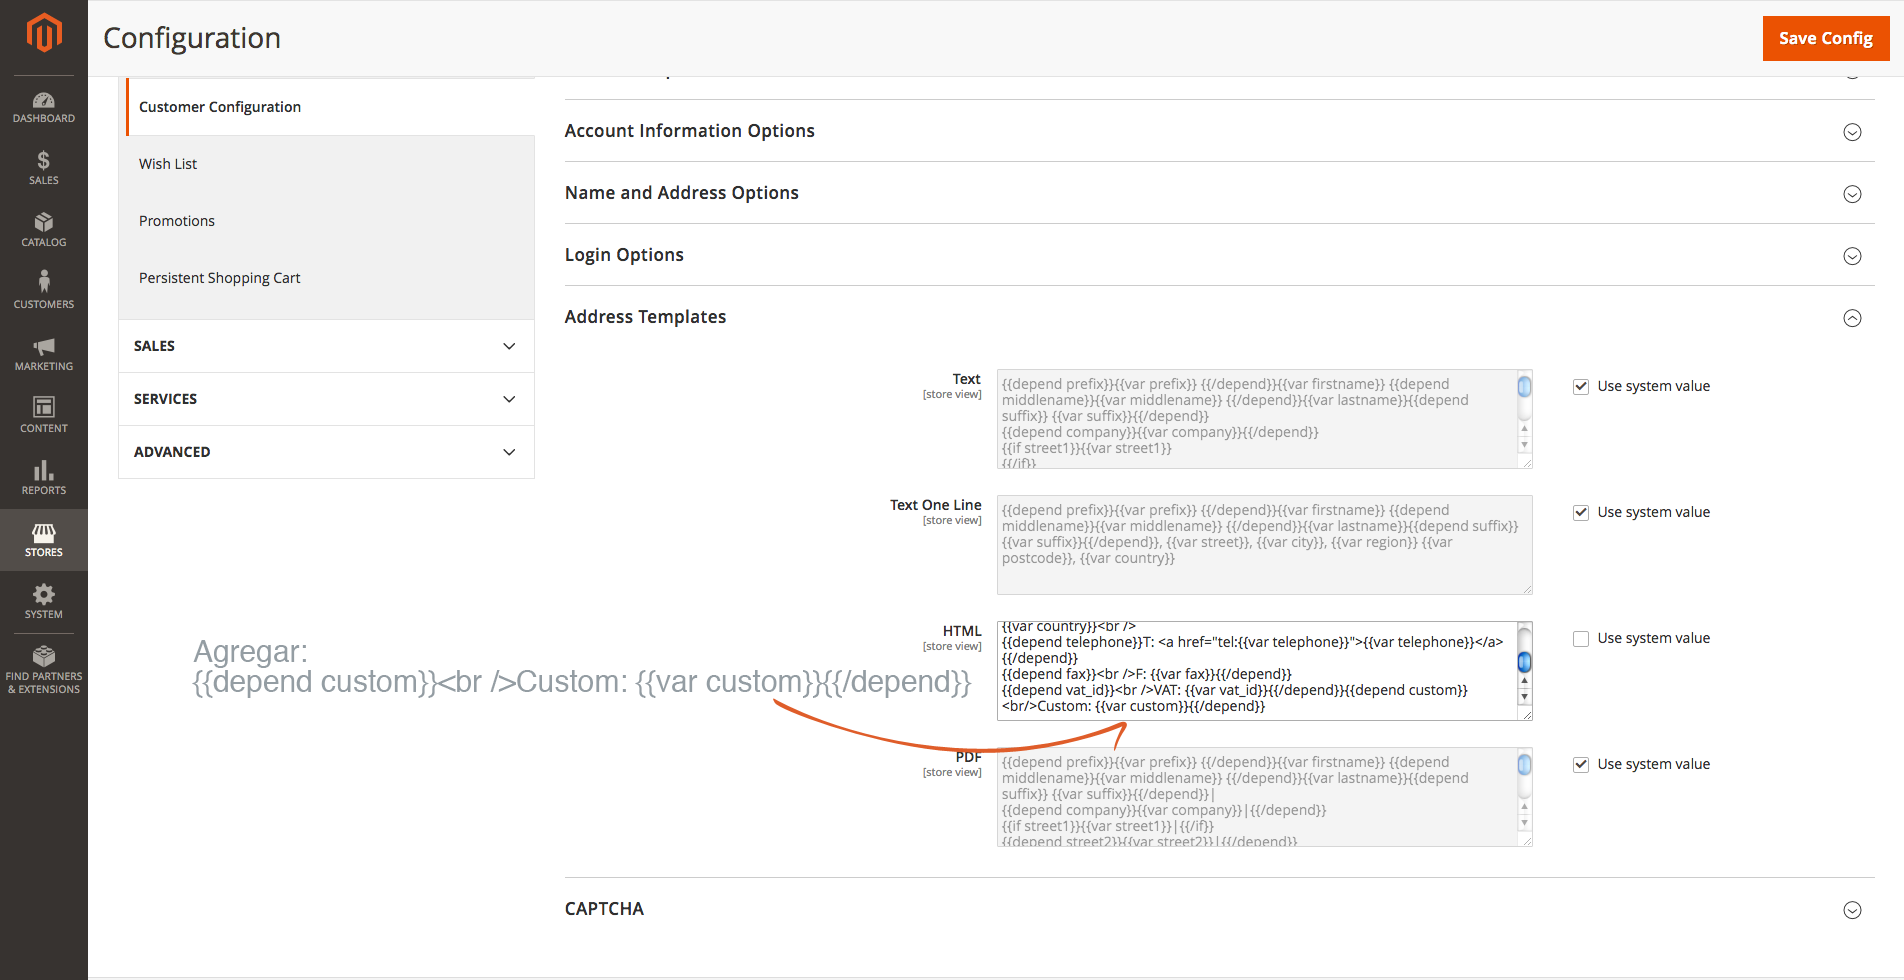
Ahora para la visualización html del “custom” attribute en “My Account/My Address” en el frontend de la tienda, y en la edición del cliente en el admin de Magento2 en “Customer/Edit-> Addresses, debemos hacer lo siguiente:
Store/Configuración -> Customer -> Customer Configuration y en "Address Templates" en HTML agregamos la nueva variable (despues de VAT):
{{depend custom}}
Custom: {{var custom}}{{/depend}}
Ver imagen a continuación:
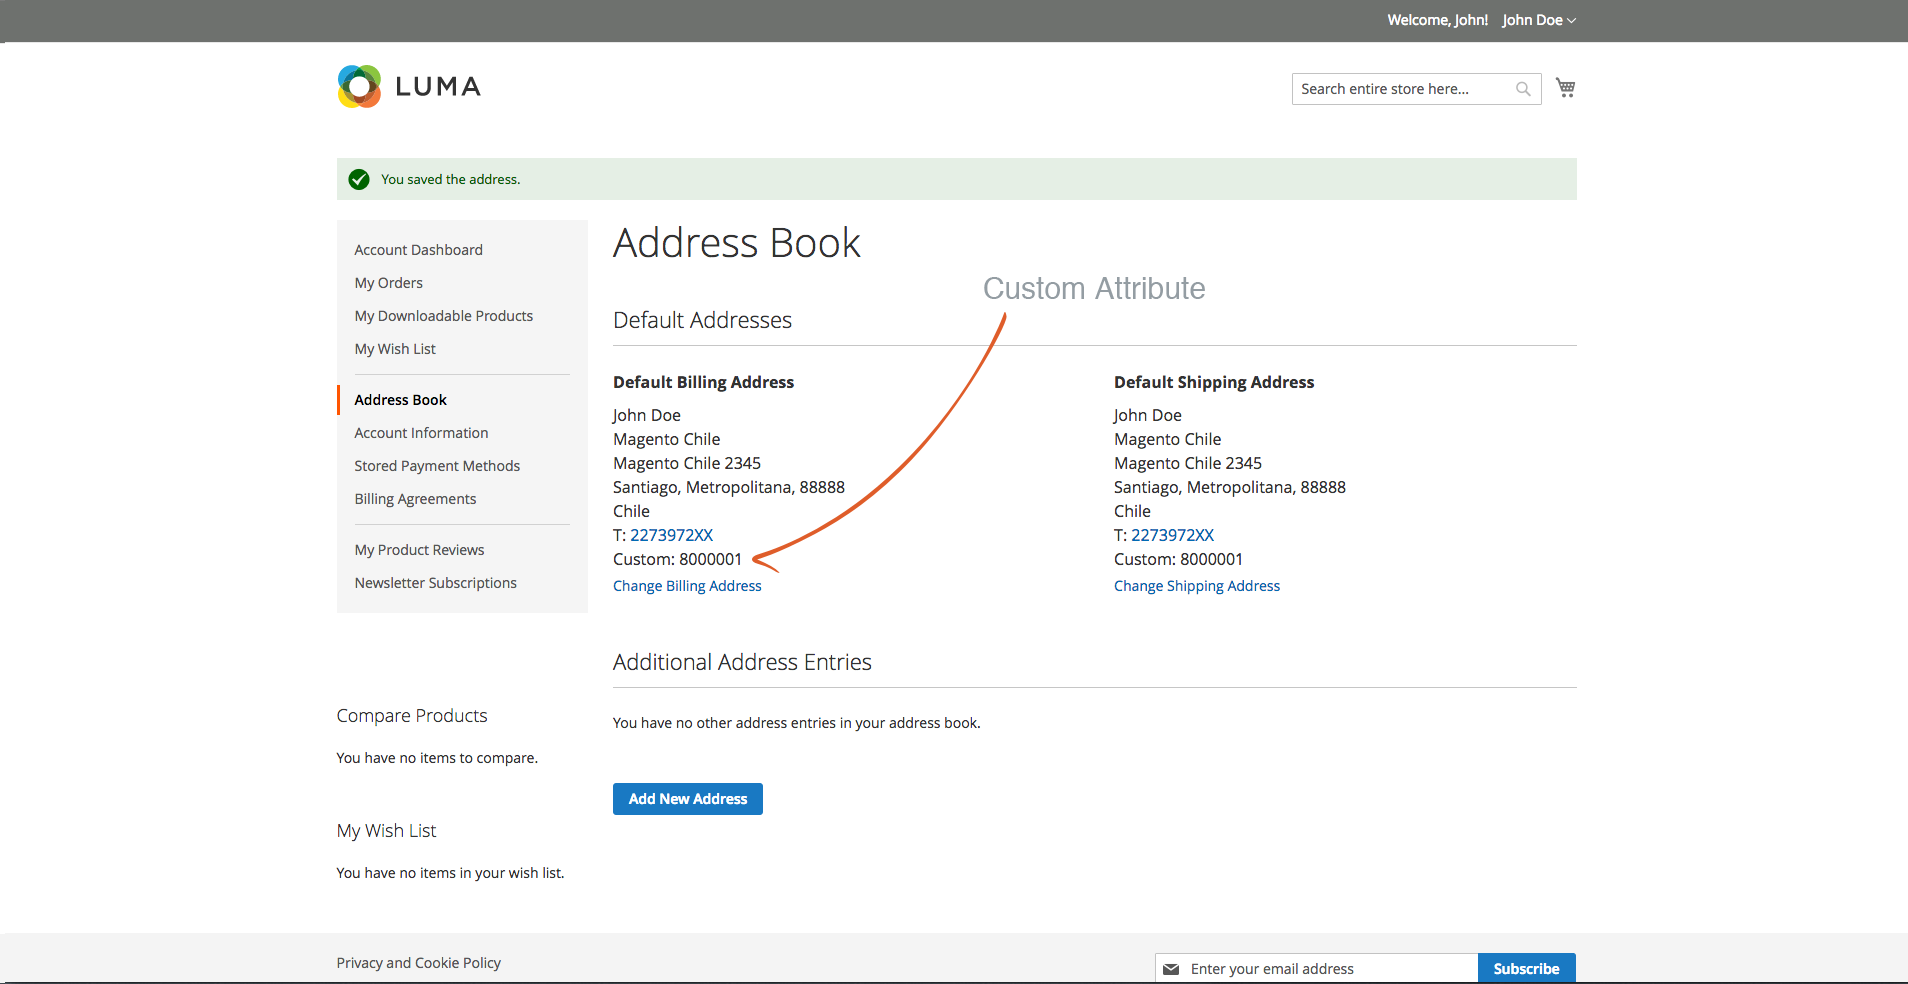
Acá te dejamos un par de imágenes del resultado del módulo:
Cuenta Cliente:
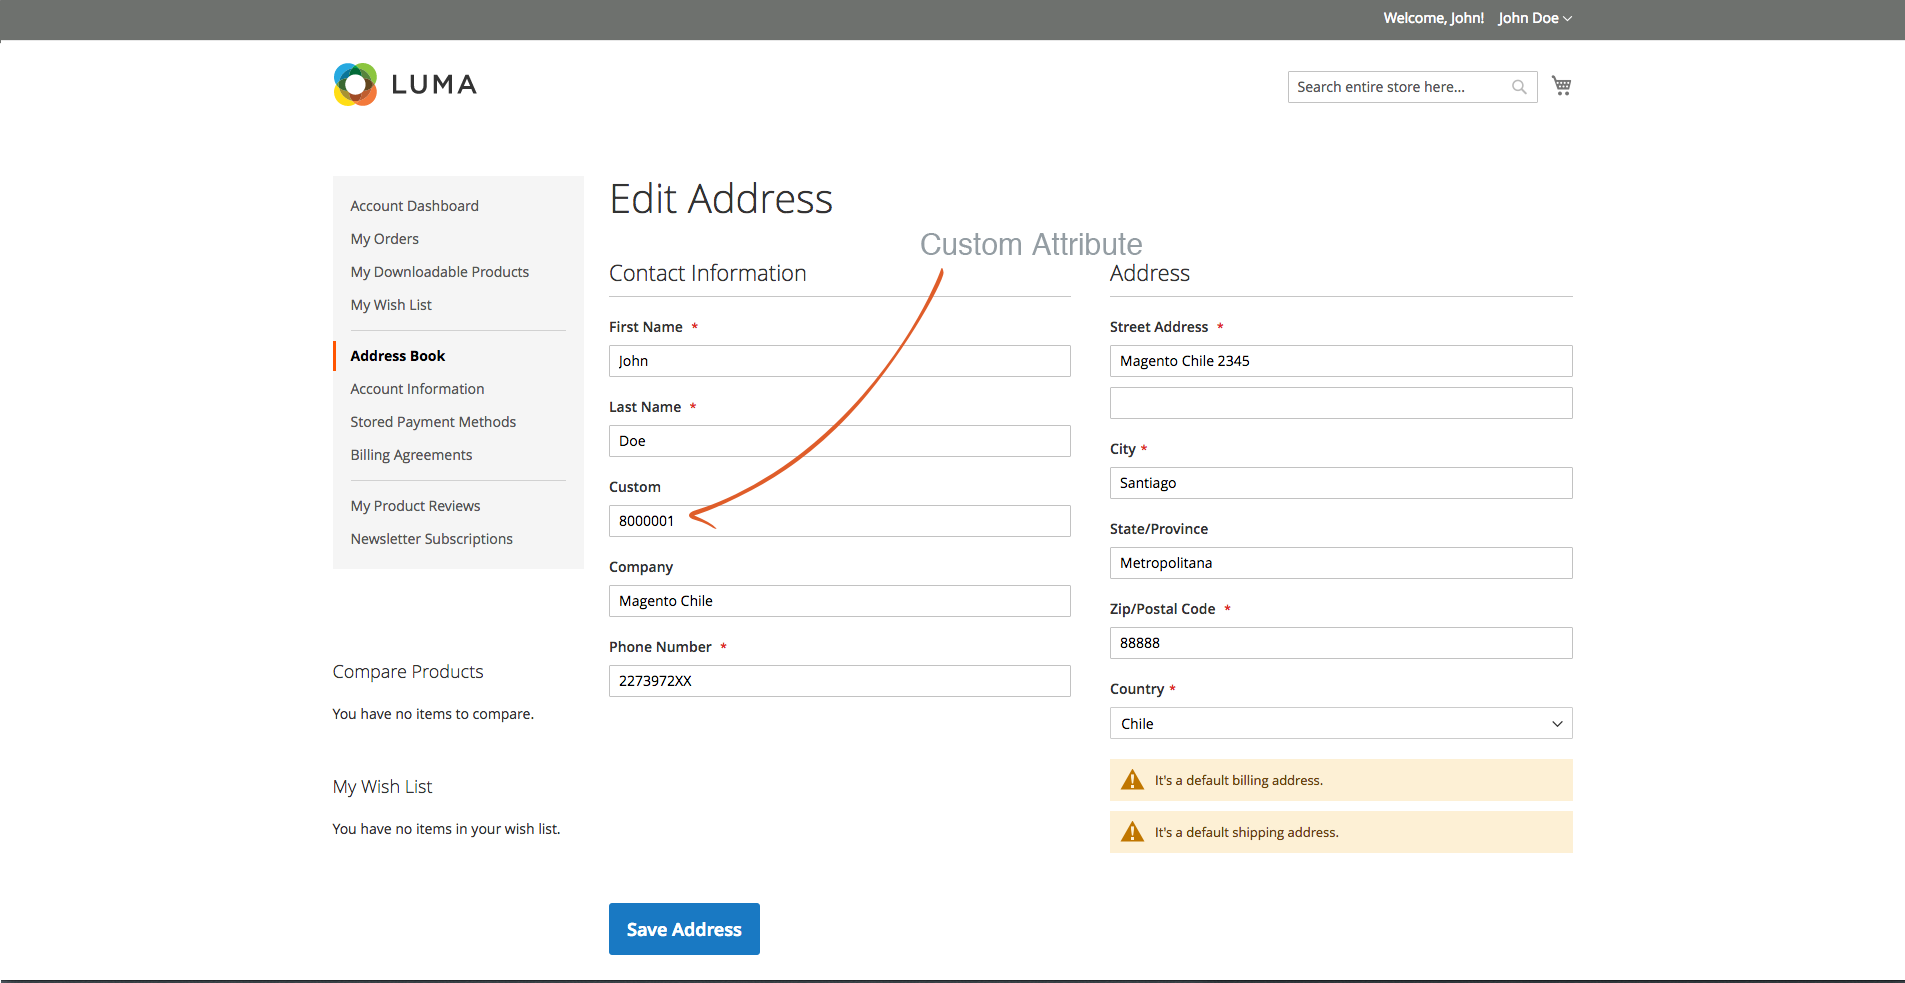
Cuenta Cliente Edit:
Cuenta Cliente Admin:
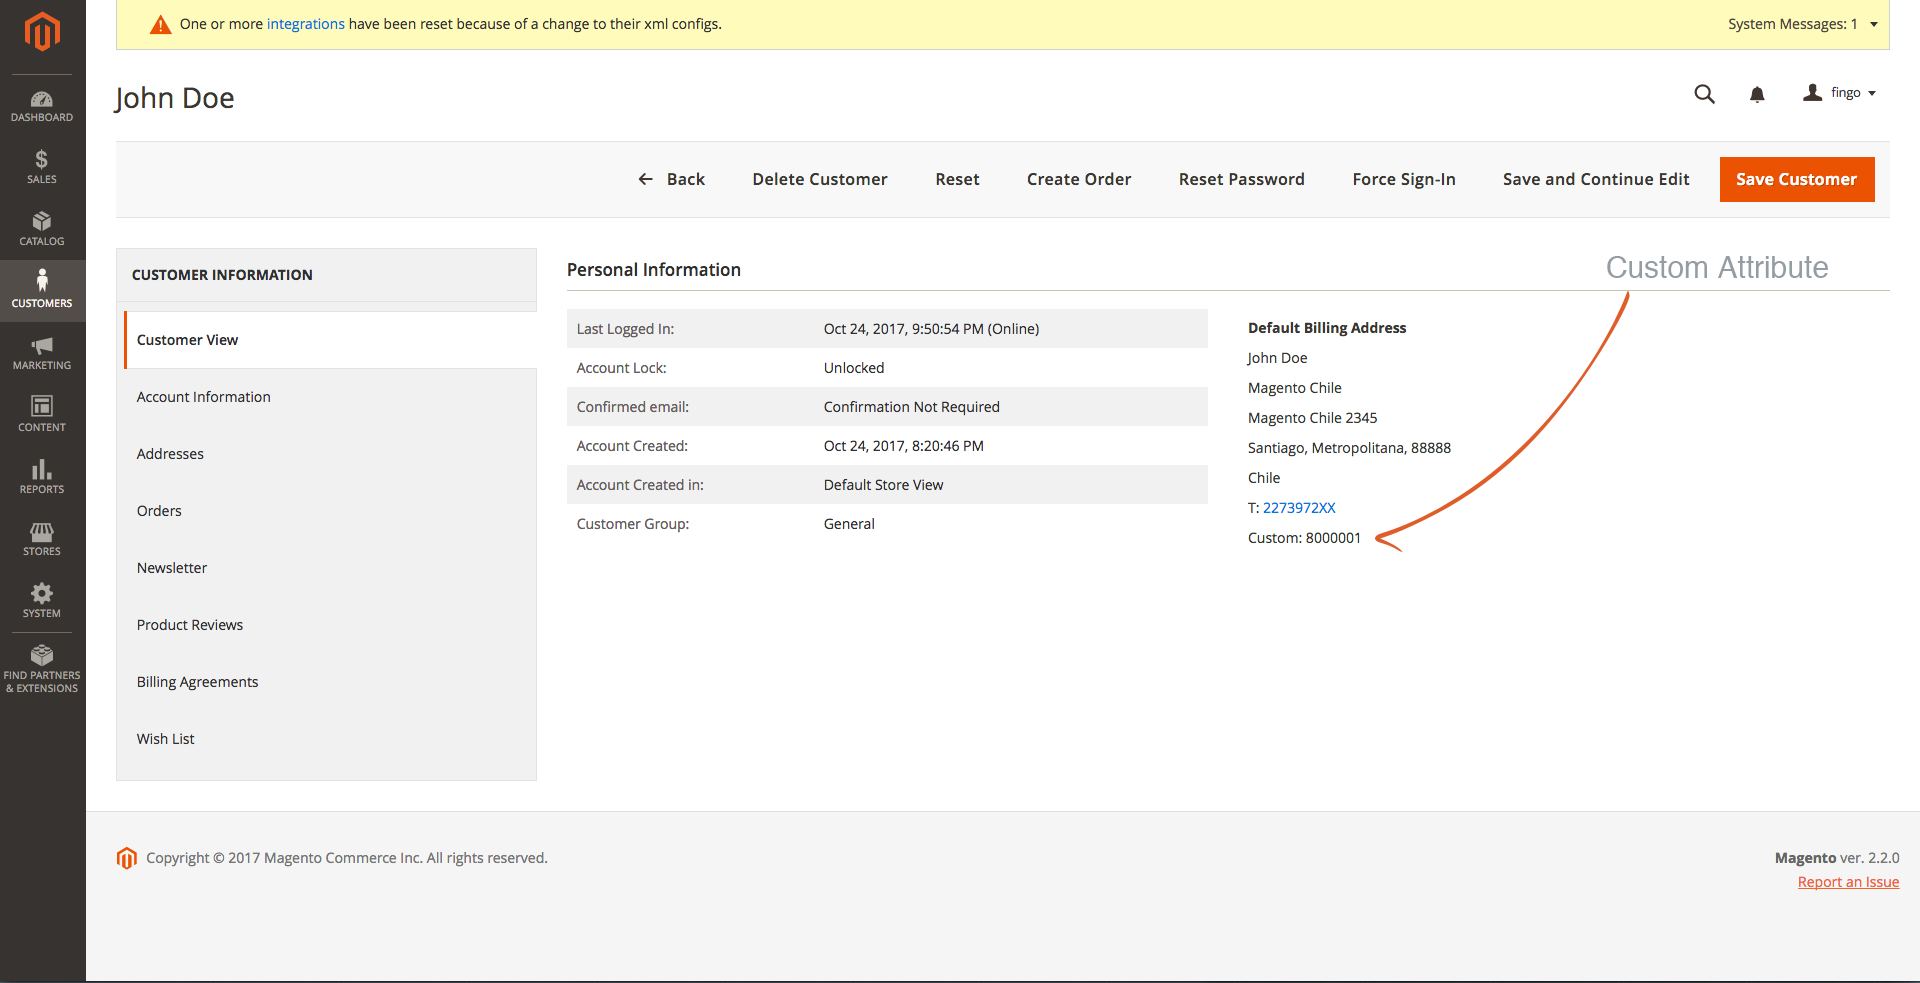
Cuenta Cliente Admin Edit:

Puedes ver el módulo Magentochile_CustomAttribute en acción, a continuación en el siguiente link:
https://tutorial.magento2.cl/customer/account/login/
Ref.: Este tutorial fue creado, tomando como base la publicación de Max Pronko, en su canal youtube. Especiales agradecimiento a él.
Además se utilizó información de la comunidad Magento en general, e información propia.
